Filed under: Uncategorized
I’m going through a spell of medical drama and I’m distracted/in a pretty impressive amount of pain right now. I wouldn’t call this a hiatus, but I think my updates are going to be really sporadic for a while. I hope to get back to regularly posting soon, but I didn’t want anyone thinking I’d disappeared!
Filed under: Uncategorized
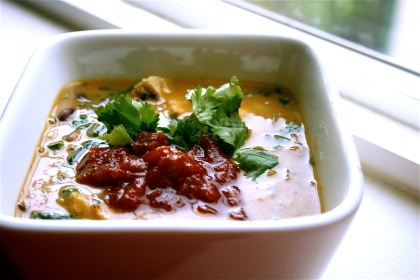
So while my parents were visiting they had me revisit a few recipes they’d seen on the blog and wanted to taste. One of them was my peanuts, which sparked a discussion with my father about various peanut applications. He mentioned something about a peanut and chicken soup. He was just sort of throwing it out there, but I knew such a thing existed, so I spent a few nights looking up various recipes and deciding where I might want to go with it.
This, my friends, is a really hearty bowl. Between the peanut butter, roasted peanuts, chunks of chicken and the kidney beans, you’ve got tons of protein. I sort of treated this as a clean-out-the-pantry kind of stew, which I really think suited it well. It’s rich, creamy and has just enough heat. I think the only thing we were missing at the meal were some really flaky biscuits to sop it up with. (Mom, I know we never got around to your biscuit tutorial, but I’m determined I’m going to puzzle this one out and you’ll see something here verrrrry soon!)
Play with the heat levels, add a few more things, take a few more out. I’ve seen many of these with lots of potatoes in them, and even more where it’s all pureed together, but I like it with the textural differences in it. More interesting!
Peanut and Chicken Stew
- 4 cups chicken stock
- 1 can coconut milk
- 1/2 cup natural peanut butter
- 1/2 cup roasted peanuts, halved
- 1 large chicken breast cutlet, diced and cooked
- 1/2 cup white wine
- 1 cup spinach leaves, chopped
- 1 can dark kidney beans, drained and rinsed
- handful of cilantro leaves, chopped (plus a tad more to garnish)
- 1 tbsp lime juice
- zest of the better part of a small lime
- 1 tbsp sriracha chili sauce
- 1 small onion, diced
- 3 cloves garlic, diced
- 1 tsp paprika
- 1 tsp chili powder
- 1 tsp cumin
- salt and pepper to taste
- a chunky, medium heat salsa to top with (Optional, but highly recommended.)
In a large pot over medium heat, sauté your onion and garlic with a good glug of olive oil. Heat until the onion is soft, stirring gently. Go ahead and add everything else except your roasted peanuts. (This IS seriously that simple. Toss a whole bunch of tasty stuff in a pot and simmer. Yum.) Let that all simmer together for about two hours, checking the level of your liquid and stirring occasionally. If you find your liquid is cooking down too fast and thickening too much, add a bit more wine or stock, or water if you’ve run out of either. Turn the heat down as low as you can, you want this to be a super gradual thing.
About twenty minutes before you’re ready to serve this, toss in your roasted peanuts. They’ll soften just a little but you’ll still get plenty of crunch out of them. Check the spice level here and if you think you wanna go a bit more adventurous, add some more sriracha, or consider some chipotle. I think the smokiness of a chipotle would really work well! Serve with a little extra cilantro sprinkled on top and a healthy dollop of salsa if you’re into that. (I am, oh I AM!)
Also: If you entered the giveaway from the last entry, check your emails tomorrow night. So few of you actually dropped me a line I’ve decided just to give a little something to EVERYONE who actually took the time out to answer my little question. 😀 I love knowing you all read, but it is really really cool to actually interact with you a bit, I want you all to know how much I appreciate it.
Filed under: Uncategorized
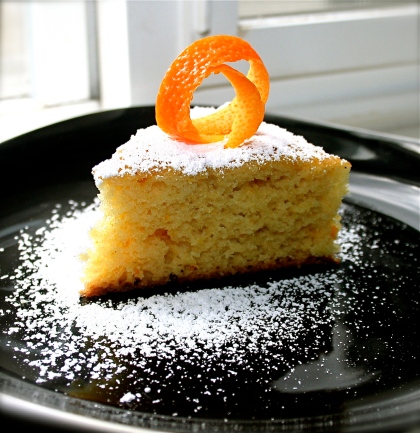
I think we’ve discussed how I’m bad at cakes, right? Well this one is so easy even I can churn it out! Olive oil cake may sound a liiiiittle weird if you’ve never had it before, but it’s a fascinating taste. Fruity, a little earthy. This one has tons of orange zest in it, so it’s really bright and sunny. It isn’t too sweet, so this is a great little teacake, something to go with your coffee or tea for breakfast or a snack. (I know, I’m so healthy suggesting cake for breakfast. Sue me!)
Olive Oil Cake
(Adapted from Bon Appétit, Sept 2009)
- 1 1/2 cups unbleached white flour
- 1 cup sugar
- 1/2 teaspoon baking soda
- 1/2 teaspoon baking powder
- 1/4 teaspoon salt
- 2 large eggs
- 3/4 cup milk
- 1/2 cup fruity olive oil
- 1 tablespoon orange zest (or more, if you’re zest crazy like I am!)
Preheat your oven to 325, prepping a 9×5 loaf pan. Mix your dry ingredients in a large bowl. In a separate bowl mix your eggs, milk, olive oil and zest. In thirds, slowly whisk your liquid into your dry ingredients. Transfer to your loaf pan. Bake until a toothpick comes out clean from the center of the loaf, which took me just under an hour. Cool in pan for 20 minutes or so and then transfer to a plate. Really really tasty with some confectioner’s sugar dusted on top, try serving it with a spicy tea!
And now to the giveaway, guys. It’s like I blinked and we got to this point, but The Recovering Vegetarian hit 10,000 individual hits last night! (We’re actually at somewhere near 10,300 now, I think!) I never imagined even half that number of people would bother reading this thing, so I’m feeling like celebrating. So I pose you a question. It’s a classic amongst foodie-types, but I think with good reason.
If you were set to die tomorrow, what would your last meal be and why? There are no limits to the meal, it can be as elaborate or as spartan as you wish. You can only answer one time and must answer by 11:59 Pacific time on Monday. I’ll pick what I feel are the two best answers and the people who gave them will each receive a ten dollar gift card to either Amazon or Itunes, their choice. Please remember to leave your email address in your comment! (I know it isn’t a huge giveaway, but it’s my first! Enjoy the excitement with me!)
Filed under: Uncategorized
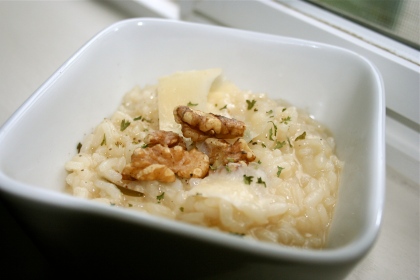
Yep, sick again. I swear I’ve some propensity towards the creeping crud since we moved out here that is out of this world. If there’s an upper respiratory bug going around, I get it. I’m coughing and nearly deaf from congestion and I’m comfort-food fiending right now; creamy and warm is the order of the day.
I have to confess: risotto is not something I have ever ordered in a restaurant. I’ve never had it at someone else’s house. The only risotto I’ve had is my own, so I might make the most mediocre risotto on the planet and just not know any better. (Maybe I’m vain, in fact I probably am, why else would I have a blog?) I’ve only made it a few times, some with more vegetables tossed in, some plain. This wasn’t a super complex take, but the head of roasted garlic in it really added to the comfort-factor for me. There’s something magical about the transformation from a cup of dry rice to the big bowl of grains floating in a creamy sauce. You just feel like you’ve accomplished something when you finish a risotto, even though it isn’t really a difficult process. It takes time but not a whole lot of brain cells, which is perfect if you aren’t feeling all that well!
Roasted Garlic Risotto
- 1 cup arborio rice
- 1 head roasted garlic
- 1 tablespoon butter
- 1 small white onion, diced
- 1/4 cup romano cheese, shaved
- 4 cups stock, water if you haven’t any stock
- 1/2 cup white wine
- 1 medium sized sprig of rosemary
- handful of walnuts, chopped
- salt and pepper to taste
Squeeze out your cloves of roasted garlic into a medium pot, toss in your onions and butter and heat over medium heat until your onions are translucent. Add your rice grains and stir for a minute or two until they are toasted just slightly. Add the wine, salt, pepper and rosemary sprig and simmer gently, stirring occasionally until the wine is nearly absorbed. Then add your stock a half cup or so at a time, simmering and stirring until it has nearly all been absorbed again. Continue the process until your stock is gone/the rice is done. It will be sort of velvety on the outside, but there will still be the slightest bit of bite to the interior of it. It took me about 45 minutes this time, I’ve seen and heard estimates ranging from 30 minutes to a full hour. Let it take it’s time, never ever try and rush this! You’ll have a lovely, silken sauce that has built up in your pot and then you’re pretty much done! Go ahead and pick out your rosemary sprig. Take the walnuts and toast them in a dry pan until they’re crunchy. Scoop a generous helping of risotto into a bowl, top with a few shavings of romano, some toasted walnuts and a little chopped parsley.
Filed under: Uncategorized
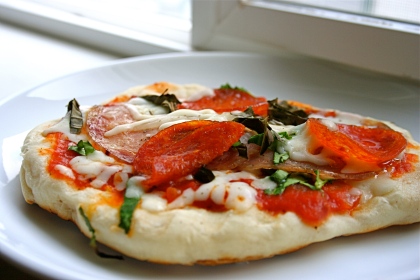
I first made these little guys on a night when my mother in law and her youngest were in town, during some of the worst of our heat wave. We all wanted pizza but nobody wanted to deal with the oven even being looked at, much less turned on. I knew you COULD do it, I’d just never done it before. Therefore my first attempts were really delicious but not quite photogenic. I got the procedure down pat this time and the results were a little more visually appealing.
You CAN use a premade pizza dough for this, but try making your own. My focaccia recipe will make really delicious pizza dough!
The quantities called for in the focaccia recipe will make six individual sized pizzas, or you can go for a big ol’ large. I stick to the individual sized pizzas because they’re easier to handle and allow for topping personalization. The sauce? We sautéed half an onion and two cloves of garlic in a tablespoon each of butter and olive oil, added half a cup of white wine and 1/4 tsp of three or four different italian herbs. Salt and pepper and simmer it down, that’s about it!
Grilled Pizzas
- 1 ball of pizza dough, following focaccia recipe until just after the first rise
- approx. 1 cup of tomato sauce, homemade or premade
- 2 cups of shredded cheese, we used a mixture of mozzarella and monterey jack
- 1/4 cup spinach, chopped
- 1/4 cup basil leaves, chopped
- 1/4 pound of sliced pepperoni/salami. We had a mix of grocery store pepperoni and a little Cotto Salami from Salumi in Seattle. (If you’re ever in Seattle, GO. Run! Salumi is worth the wait in line.)
- Salt and pepper
Portion your pizza dough into six even balls. Heat your grill to a medium-high heat, then stretch your dough balls out thin and place them on your grill. Cook on one side until it’s crispy and a little golden, then take off the grill. Once you’ve done them all, dress the sides that have already touched the grill with your sauce and desired toppings. Place the uncooked side back on the grill and cover for a few minutes, until the bottom is really crispy and your cheese is melted through. Serve immediately, maybe with a beer and a simple green salad? Just a suggestion. 😉 This is an incredibly versatile formula, you can do just about any pizza you like this way. I really want to try a pesto sauce, something with chicken and bacon next time. Or breakfast pizzas! Oooh. Breakfast on the grill, can you beat that?
Filed under: Uncategorized
Sorry for the lack of updates this week, but we’re in the Pacific Northwest of the U.S. and we’ve been having an epic heatwave the past week or so. We reached over 100 degrees at several points, and like a great number of people out here we have no air conditioning, not even window units. I’m pretty sure cooking of any sort would have been suicidal.
I’m itching to get back in the kitchen though, and with my parents coming next week I expect to have ample opportunity! Thanks for sticking with me.
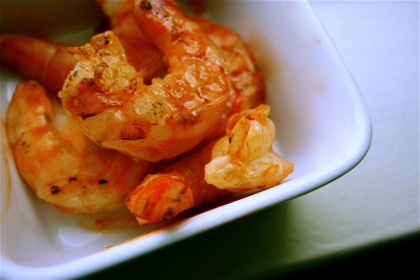
It’s hot today. And by hot, I mean Pacific Northwest hot: In the low nineties and stagnant as all hell. I didn’t feel like doing a darn thing to the stove/oven today and declared it a grill night. I knew I’d be trying to grill pizza, which ended up super tasty but not super photogenic. (I’ll end up sharing that one here soon, I promise.) I just needed something to go along side with our salad and pizza. I had about twenty gorgeous tiger prawns in the freezer and needed a crowd pleazer.
Bam. Buffalo sauce. Hot and messy. This recipe is quick, easy and a great appetizer. I would have upped the heat a bit and added a little powdered cayenne, but I wanted to play to the crowd here. Use what you’ve got and go with a heat level you and whoever else might be eating them are both comfortable with. Or make separate batches! It’s simple enough that a few separate batches aren’t really that much work.
Buffalo Tiger Prawns
- 20 prawns, shelled and deveined.
- pinch of salt
- stick of butter, melted
- 1 cup vinegar based hot sauce. (I used Frank’s brand.)
Put your grill to a medium high heat and lay out your prawns. Turn them in about two minutes and then put the lid on. Check in three minutes to see if they’ve gone opaque all the way through, leave them on a minute longer if they haven’t. Melt your butter, add hot sauce and mix. If you’re interested in adding more heat, a 1/4 teaspoon of cayenne or chipotle pepper would be beautiful here! Toss your prawns in some of the sauce, serving with the rest on the side. What you’ll end up with is a big, meaty prawn that is a little crispy on the sides and packs a bit of a punch!
P.S. Back to a more regular posting schedule next week, I think. Family in town means a lot more running around which means a lot more quick meals!
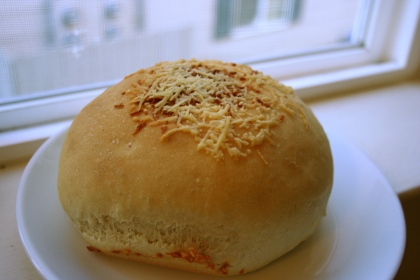
I am a carb fiend. Pasta, bread, sweets…Anything carb-related brings me incredible amounts of joy. Bread is one of those things that took me a long time to get right, and I’ll be the first to admit I still have nights where I am just OFF. You know, you did everything the recipe said and it STILL didn’t work out right. I get those weekly, I think.
A really good white bread recipe is a thing of beauty. It’s substantial enough to hold a serious array of meats/cheeses/veg in it, but still mild enough in flavor to not be competing. But it can’t be that mushy sawdusty store-bought crud. This stuff is more than tasty enough to just butter and toast it, you know?
White Bread
From Baking With Julia by Dorie Greenspan (should make two substantial loaves)
- 2 1/2 cups warm water
- 1 tablespoon active dry yeast
- 1 tablespoon sugar
- approx. 7 cups bread flour or unbleached all-purpose
- 1 tablespoon salt
- 1/2 stick unsalted butter, at room temp.
Pour half a cup of that warm water into a bowl, sprinkle in the yeast and sugar and whisk to blend. Let it sit there until frothy, about five minutes.
Add the remaining two cups of water and approx. 3 1/2 cups of the flour to the yeast. Mix carefully, by hand or with mixer, making as little a mess as you can. I tend to cover my counters at this point. Going slowly, add the other 3 1/2 cups and mix until it comes together into a shaggy dough. If it’s still a little too liquid-y, add a little more until it comes together. This is where I add the salt and butter, then begin the kneading process. Some people prefer to let the mixer do the work, I actually enjoy doing it by hand! Lightly flour an area of your countertop and knead for 10 minutes or so, or until the dough is smooth and elastic. Set a timer if you need to, once you’ve seen properly kneaded dough once you’ll probably be able to eyeball it. If you do it in a mixer, it will take about half the time.
Oil a large bowl and place your gorgeous dough ball into it. Roll the ball around a little to cover every surface with oil and then cover the entire bowl tightly with plastic wrap. Leave it alone until it doubles, an hour or so.
After the first rise, punch it down and shape into loaves/buns/etc. If you want a sandwich style loaf, this will fill two 8 1/2 by 4 1/2 loaf pans nicely. I managed to get a sandwich loaf and half a dozen buns out of one batch. Cover your loaves with plastic wrap again and let them, you guessed it, double in size again. Try for about 45 minutes. While they’re rising, preheat your oven to 375.
Once the loaves have risen, stuff them in the oven for 35-45 minutes. They’re done when they’re golden brown and sound hollow when you thump them with your finger. Take them out, turn them out of the pans and let them cool. Resist the urge to cut into them until they’re completely cooled, please. (I know its difficult, I swear.) They’ll keep for a few days in a brown paper bag, but I can’t imagine them not being eaten before then! They’ll also freeze well in an airtight container for up to a month or so.
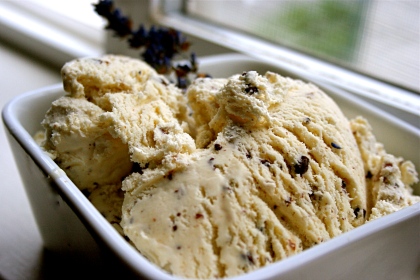
I have really got to think of a catchier name for this stuff. Any suggestions?
I’ve been sort of consumed with the idea of a food application for lavender ever since I realized that people really DID eat it. And I just happen to live in an area known for growing it, so the farmer’s market is full of it. I got this bunch the size of my admittedly impressive skull for all of three dollars the other week and I’ve just been put-putting around trying to decide what to do with it. I’ve come across far more esoteric applications for it, but this seemed a safer bet. Something sweet, something with other flavors to balance it. While I have been known to shove a flower into my mouth here and there, I didn’t think anyone else would be interested.
The general consensus was “HIT!”, with people who weren’t made aware of the lavender just saying there was something really interesting they couldn’t place, and sort of an “Ahhh!” when I told them. I was initially concerned the lavender would be a little overpowering, but it really mellowed. Next batch I think I’m going to come up with some sort of combination involving olive oil…
Lavender Double Vanilla Ice Cream with Dark Chocolate and Pecans
(From David Lebovitz’s article “Scooped!” in Fine Cooking June/July 2009)
- 2 cups heavy cream
- 1 cup whole milk
- 3/4 cup sugar
- salt
- 5 large egg yolks
- 2 Tbs dried lavender
- 1 vanilla bean, split and scraped. (Remember to use the split bean and scraped seeds.)
- 2 tsp. real vanilla extract
- 4 Tbs dark chocolate, chopped
- 4 Tbs toasted pecans, chopped
The first step is making your custard, which I was a little terrified of at first. It is genuinely labor-intensive, but isn’t that difficult.
In a medium saucepan, mix 1 cup of cream with your milk, sugar and a tiny pinch of salt. Warm it over medium-high heat, stirring occasionally. When the sugar is melted and small bubbles start to form around the edges, add your lavender and vanilla bean/seeds. Cover and remove from heat. Let that sit for at least an hour, checking the strength of the flavor. Like it? Go ahead on with the rest of the process. Not a fan yet? Let it sit a while longer.
Start your ice bath. Fill a large bowl with several inches of water and ice. Set a smaller metal bowl into the ice water, then pouring that last cup of cream into the smaller bowl. Get out your strainer and set it next to it. Whisk your egg yolks in a separate medium bowl.
Go ahead and re-warm your cream mix here, just for a minute or two. With a steady hand, pour half of the warm cream into your egg yolks. Take care to whisk constantly or you’ll end up with curdled yolks. Pour that egg mixture back into your saucepan now, cooking it over low heat. Stir this thing like your life depends on it, not frantically but thoroughly. Scrape the bottom with your spoon while you stir. Do not overheat it, DO NOT boil it, just heat it gently and keep it moving until thick, 4 to 8 minutes. Strain it immediately into your cold cream. Press the bits of lavender and vanilla into the strainer with the back of a spoon to get all of that flavor out. Cool your custard by stirring it over your ice bath, once below 70 degrees or so, add the vanilla extract.
Place your custard in the fridge for a few hours, until it’s completely chilled. Then pour it into your ice cream maker, adding the chocolate and nuts as it churns. Share it with your friends and neighbors, or don’t. I was sorely tempted to keep it for myself!
Filed under: Uncategorized

Monkey Love Cake
Guys, I had huge plans here. I promise you. This was supposed to be a layer cake, a beautiful thing covered with little marzipan monkey carvings. What happened, you ask? (Pretend you’re asking, okay?) Well, only one of the layers came out of the oven intact. And the monkeys? Well three a.m. happened to them. But I feel this conveys what I wanted to convey, albeit messily. And it tastes really good!
So what’s the occasion?
My baby sister is turning nineteen today. Just saying that makes me feel old! (And how old it must make our parents feel, aaaah!) So, Becca…This is for you. I know I can’t be there, and this can’t be in your face right now, but consider it a long distance tribute.
In your nineteen years on this planet we’ve been through a lot. Some of the situations have been ones where lesser human beings would throw up their hands and say: “Alright dude, good luck.”, and walk. And there might’ve been a time or two when I’ve said those exact words to you, but I never reaaaaaally meant it.
I remember when they brought you home. I remember your curly little-girl mullet, how I could always make you laugh. I remember when you were convinced my hair was made of gold and I could always trick you into brushing it for me. And I will never forget the first time we left our daughter alone overnight and came back to see the two of you sleeping on the couch, little mirrors of each other. I could have cried, I might have actually. (Not that I’d ever have admitted it in front of you, oh no!)
I know the period of time since you’ve graduated hasn’t been easy, it’s been a rocky time for all of us. I just want you to know these things:
- Nobody is pulling your chain or kissing your butt when we tell you that you are a genuinely talented artist. You’re really good.
- We all love you, might even be willing to have a cage match over who loves you more. At least on one of your good days. 😉
- You have grown into a beautiful woman. Seriously, it takes me aback every time I see you. I forget you aren’t that stubby little girl anymore. (Yes, I know you’re like six inches taller than I am.)
- Whatever you do with your life, as long as you are happy and fulfilled, we will all be proud of you. I just personally hope it involves tons of travel, so we can see you more often. 😀
- I love you. Simply, honestly. You are wonderful.
I hope I’ve sufficiently E-embarrassed you. I know you’re upset about not being able to come out this summer, but you are welcome as soon as you’ve got the time and the dough. We’ll keep the couch clear! And until then, I solemnly swear to pick you up some treats at Uwajimaya the next time we’re in the International District! I wonder if they sell Pocky by the pound?
Dark Chocolate Cherry Monkey Love Cake
Modified from a recipe in How to Cook Everything, Mark Bittman
- 1 stick butter, softened
- 2 cups all purpose flour
- 4 ounces dark chocolate, chopped
- 1 cup sugar
- 2 eggs, whites and yolks separate
- 1 teaspoon vanilla extract
- 2 teaspoons baking powder
- 1/2 teaspoon baking soda
- 1/2 teaspoon salt
- 1/4 cup cocoa powder
- 1 cup milk
- 1/4 cup bing cherry puree
Preheat your oven to 350, grease the bottoms and sides of your cake pans. Melt your chocolate over very low heat, stirring gently. When it is melted, add your cherry puree and heat for another minute, stirring all the while.
Cream your butter and sugar with a mixer for 4 minutes, or until really fluffy. Beat in your egg yolks, then vanilla, then your chocolate/cherry mixture. In a separate bowl combine the flour, baking powder, baking soda, salt and cocoa powder. Mix it into the liquids bowl in thirds, alternating with the milk. Mix until the batter is smooth.
Remove your beaters and clean them. In a clean bowl, beat your egg whites until they reach the soft peaks stage. Fold into your cake batter gently with a spoon. Pour into the pans and bake until a toothpick or other such improvised cake tester comes back clean after poking it gently into the center of your cake. Let it cool for five minutes IN the pan (This is where my layer failure came into play!) and then turn onto a rack to finish cooling. While it’s cooling, go ahead and make your frosting!
Cherry Buttercream Frosting
- 1 stick butter, softened
- 4 cups powdered sugar
- 3 tablespoons milk
- 2 teaspoons vanilla extract
- 1/4 cup cherry puree
- dab of icing coloring, red (optional!)
Beat the butter with your mixer, gradually adding the sugar and alternating with the milk. Mix thoroughly. Mix in the vanilla, puree and salt. If you don’t like the color yet, add a little coloring. If your icing is too thin, add a little more sugar or refrigerate. Too thick? Add a little more milk or even cherry puree.
And yes, Becca, you can certainly demand Mom make this for you. SHE HAS TO LISTEN IT IS YOUR BIRTHDAY AHAHAHA. 🙂